


Welcome
Welcome To emilyemr Aesthetic Clinic Software
2024-02-12 Update
Cumulative Updates
- ePower Analytics – more reports for services as well as toxins and fillers. We now display on the dashboard your average Toxin and Filler invoice amount. We are also displaying revenue, costs and net revenue as a percentage of revenue on the toxin and filler ePower report.
- Online Payments for Booking – You can now both take credit cards for online booking and charge for missed appointments whether the patients cancels the appointment or your staff does.
- More detailed information regarding appointment cancellations such as who performed the cancellation, date, time and reasons.
- Taking credit card information for staff booked appointments and charging for missed appointments is an option.
- Reorganized organization and clinic settings area for multi-clinic organizations.
- More robust permissions for users and much easier to assign permissions. copy and paste functionality as well.
- As always, multiple minor bug fixes and optimizing the user experience to speed up the system.
2023-11-01 Update
Cumulative Updates
- eForms – ability to send eforms to patients for completion at home through the patient portal.
- Kiosk mode for in-clinic patients to complete their intake form as well as any other forms required for their appointment that day.
- ePower Analytics – The most powerful reporting tools available anywhere has been introduced with emily. This information is unparallelled and harnesses all the data from your emr to help you make better business decisions.
- eTreatment Forms – custom treatment forms for your specific devices.
- White Glove Service – This is a new service emily is offering to clinics where we manage the entire transition from one software program to another. You don’t have to do anything, we train, migrate and setup everything for you so you can move seamlessly from your old software to emily without any hassles or downtime.
- Drawings – you can now add photos to patient charts complete with the ability to draw with multiple tools
- Group pricing for Injectables – A clinic in Michigan asked us to implement this and we though it was fantastic so we did it.
- CoolTone – A brand new treatment from Allergan Aesthetics, we now have a customized treatment template just for this new procedure.
- Custom text for invoices.
- Improved patient workflow for online booking. This update makes it a lot smoother and simpler for patients to schedule their appointments.
2023-02-04 Update
Recent Updates
- Updated eForms styling
- eForms available for patients to complete through online portal
- Photo tag system updates
- Injectable template updates
- Schedule updates
Upcoming Enhancements
- Integrated payments – online and in-person
- Permissions interface enhancements and updates
- New patient intake form wizard
2022-12-05 Update
Bug fixes and ongoing enhancements
- Login url issue fixed
- NEW eForms builder continued development
- Reservations created at wrong time fix
- Clinic standardization of supplies complete
- Toggle to require credit card to schedule service
Add A New User
- Step 1: Go to the Organization>User Tab
- Step 2: Click the “+Add User” Button. This will open a pane on the right side of the page where you can enter user details.
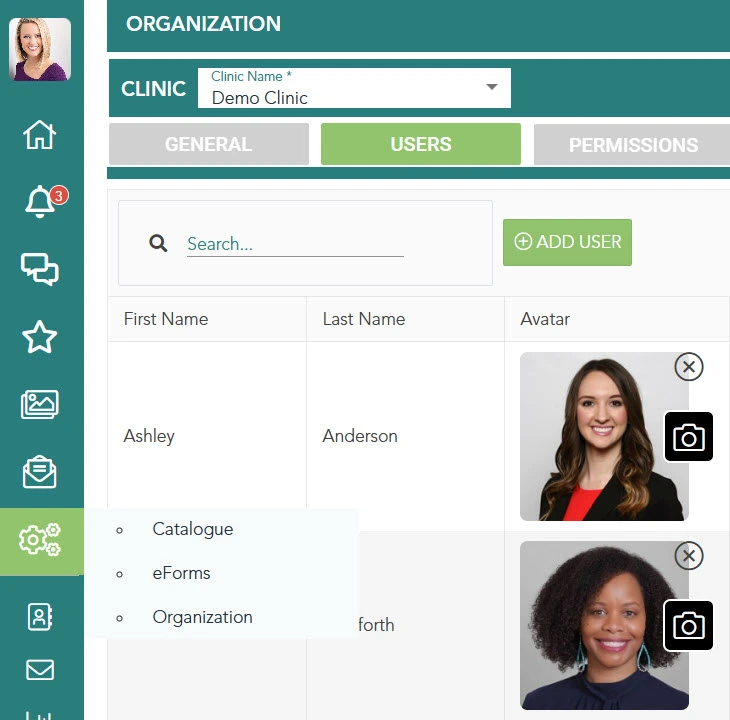
Here we will outline how to add a new user to emily. Users can be receptionists, assistants, technicians, physicians, nurses, bookeepers, accountants, owners or anyone who is involved and you want to allow them access to the system.
-
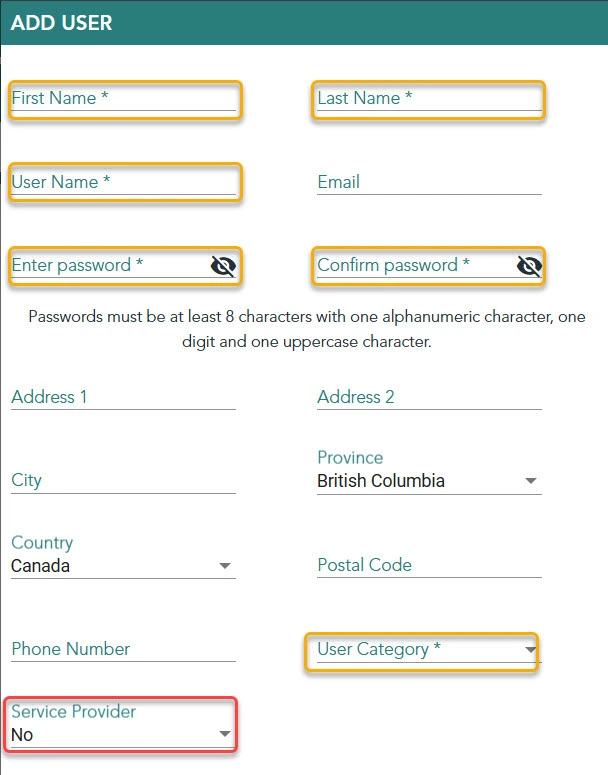
Step 3: Add the following required fields (yellow)
a. First Name, Last Name
b. User Name
c. Password
d. User Category(bottom right)
Once you have finished, click the “Add” button at the bottom of the panel to save the new user. -
Step 4: If this user is going to be performing treatments as a “provider”, and you wish to see them on the schedule, update the Service Provider field from No to Yes. (red)
a. Service Provider – Yes
Multiple Clinics or Multiple Accounts, Which One Should I Choose?
Multiple Clinics or Multiple Accounts - How Do I Choose?
- Multiple providers sharing a single practice space but responsible for their own admin and data
- One single owner with multiple clinics that do not share providers, branding or client list
- One single owner with multiple clinics that do share practitioners, branding and client list (Chain)
- One single owner with a mobile practice that works out of 2 or more different clinics (corporate, mobile or home based for example)
Items to Consider
- Patient Accessibility: Are the same clients seen across multiple clinics? If so, the Clinics feature allows for the same username and password to be used to book at both clinics.
- Chart Accessibility: With a single account, you would see one single medical chart for clients that are seen across multiple clinics. Multiple accounts would have a separate chart for the client at each clinic.
- Change in Ownership: If you sold your clinic, how would you want all the data to be divided? If you plan on selling one clinic and keeping another, then multiple accounts would make sense for a simple transition of data.
- Access of Data: Emily offers many different access levels that allow you to limit the information available to everyone with administrative access to your Emily Account. Reports and Exports can be limited to individual information only, or can be set to allow for more shared access.
- Admin Access and Reporting: Do you have shared admin across all practitioners? It can be hard for admin staff to manage multiple accounts if they are booking and receiving payment for your clients across multiple clinics. A single account makes it simpler for admin and also allows for aggregated data on reports across all practitioners.
Further Points to Consider
- Logo and Branding: There is one logo and branding available per clinic. So a single shared account will be able to have the information required for each clinic.
- Email communication: When Emily emails out the notifications and reminders to clients, the clients can respond back to those emails and Emily will redirect them to the clinic’s email address. However, there can only be one reply-to email address per Emily account or clinic. Every clinic will use this reply-to address.
- Billing for the License Fee: We can only charge a single card per Account for the Emily license fee – so if you are sharing an account you would need to manage the splitting of the license fee outside of Emily.
Pricing
One Account with Multiple Clinics
Multiple Emily Accounts
- Should the clinics or practitioners part ways or sell their practice, they would now be outside of any sort of pricing agreement. There’s no mechanism to link accounts within Emily.
- The second point for us is that running additional accounts comes with extra costs to Emily around importing, training, and hosting.
Permissions

You will find User Permissions located in the Settings > Organization > Permission Tab.
CLINIC
Clinic Access Location
Clinic Cancellation Reasons
Clinic General
Clinic Merchant Devices
Clinic Online Booking
Clinic Payments
Clinic Resources
Clinic User Permissions
Clinic Users
COMMUNICATIONS
Communications Appointments
Communications Email Templates
Communications Retention Campaigns
This permission will allow the user to create and edit retention campaigns (marketing campaigns) that are sent via sms or email to patients on a one-time basis or on an automated customized schedule.
Communications Summary
MANAGEMENT
Access from Any Location - No IP Filter
Address Book
Appointments
Billing
Catalogue
Forms
Gallery
Inventory
Messaging
Inventory Notifications
Organization
Staff schedule
PATIENTS
Account
Account Transactions
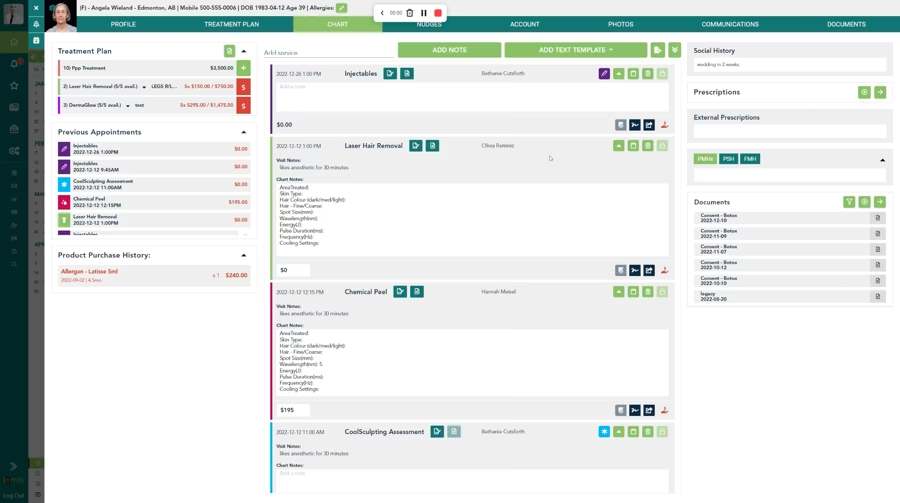
Patient Chart
Patient Chart Download
Patient Communications
Patient Documents
Patient List
Patient Merge
Patient Nudges
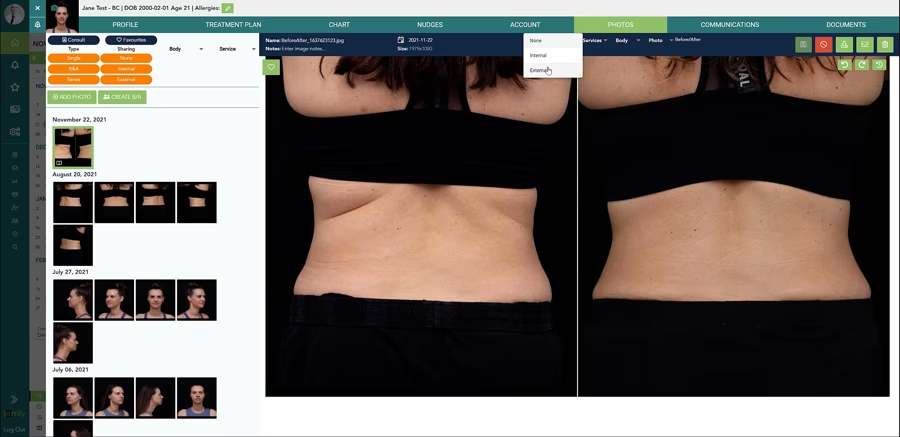
Patient Photos
Patient Profile
Patient Treatment Plan
REPORTS
Report Tabs
Reports - Power (ePower Reporting)
REVIEWS
Reviews Edit
Reviews Request
Reviews View
Request Google Review
Add Clinic Services
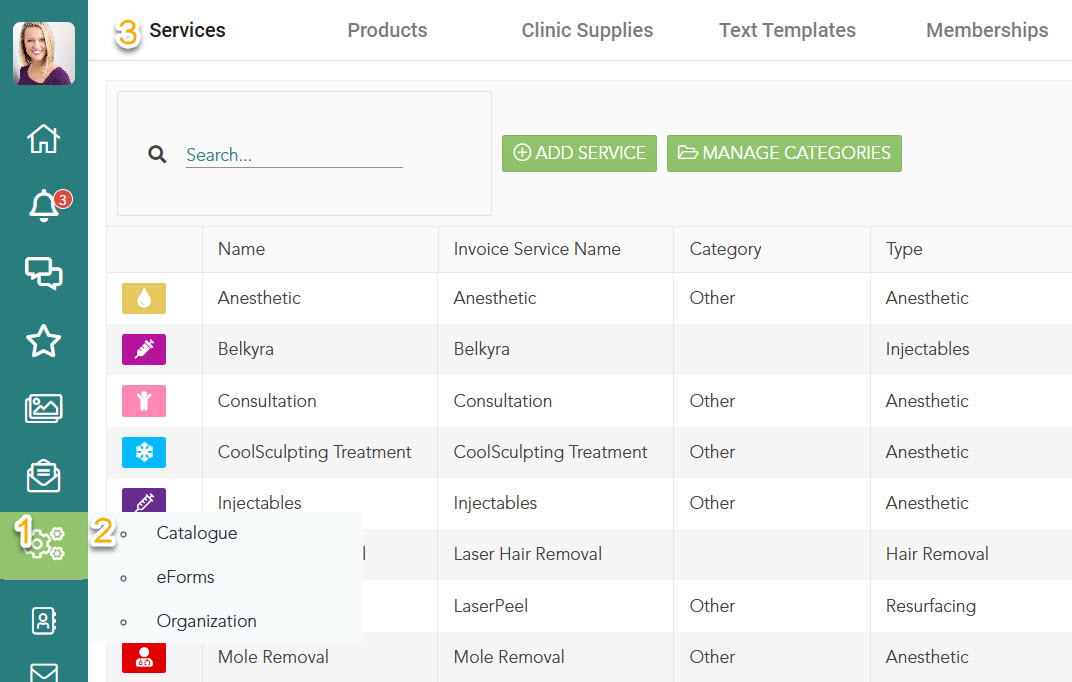
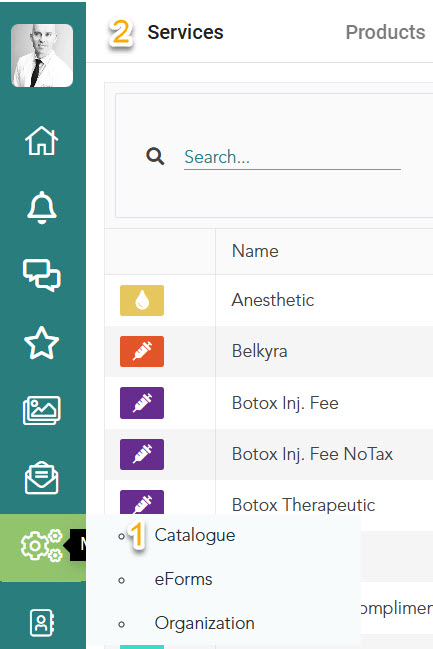
- Step 1: Go To: Management>Catalog>Services
- Step 2: Click the “Add Service” button. This will open a pane on the right side of the page where you can enter the details for the service you offer.
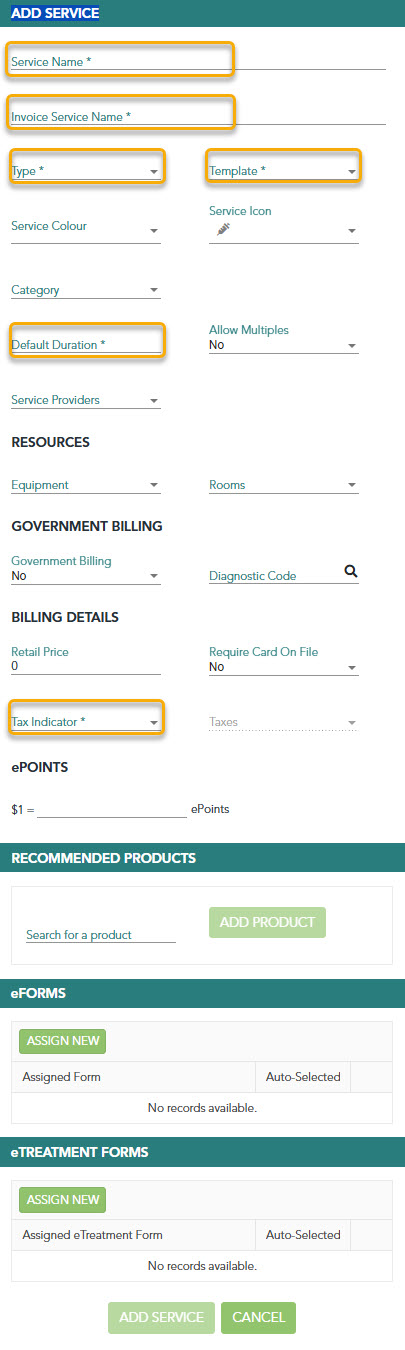
- Step 3: The following are the default fields required for each service.
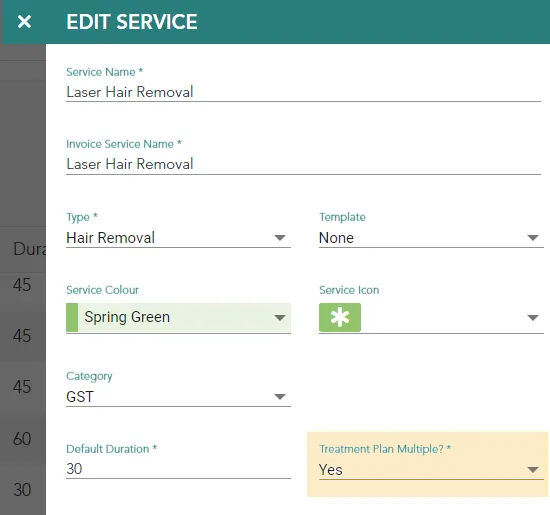
Service Name – This is what you want to formally name your service
Invoice Service Name – This is what you want patients to see as a service name on their invoice or for online booking. Normally these two are the same but sometimes you may want to differentiate.
Type – This is to categorize the service and is required to indicate what general category the service belongs to so we can understand which services are most important to you and your clinic.
Template – Select one of 4 templates here if applicable.
- Injections – this will automatically display the injectable template for toxins and fillers when this service is scheduled and available for charting.
- CoolSculpting – Select this if the Service is CoolSculpting
- CoolTone – Select this if the Service is CoolTone.
- Deoxycholate – Select this if the Service is for Kybella/Belkyra
Default Duration – This is required to schedule any service but can be modified before the chart is closed and locked.
Service Colour – choose what the service colour is on the schedule and elsewhere in the system for easy identification
Service Icon – This icon displays in the chart when you have a treatment template or eTreatment form associated with the service.
Category – You can categorize your services if you wish or leave this blank.
Allow Multiples – Setting this to “Yes” will allow you to create package treatments for this service in the Treatment Plan tab. ie., laser hair removal packages.
Service Providers – Select the users/providers who can be scheduled for this service. This is an important field because a service will not be available to be scheduled for someone unless they have been added here.
Resources – Equipment – You can associate equipment with this service so you are notified of any scheduling conflicts.
Resources – Rooms – You can also associate rooms with this service to avoid double booking the same room.
Government Billing – This area is only for billing government insured services in Canada in the following provinces: AB, BC, ON. You will need a billing account for this as well, contact us for more information.
Billing Details – Add the default price for this service if applicable. This price can be updated if required for each treatment/patient. Do not enter a default price if this service is for Injectables, CoolSculpting, CoolTone or Deoxycholate because your clinic supply pricing will apply instead.
Require Card On File – You can request a credit card from the patient to schedule this service. ie., Consultation. You can enter a credit card manually or have the patient enter their credit card online to hold the appointment.
Tax Indicator – We need to know the tax status of this service for payment reasons.
Taxes – Please check the taxes that apply to this service. You need to setup your local taxes in the Billing section of your organization/clinic.
ePoints – You can generate ePoints for your patients every time they spend money on this service. In the General tab of your clinic you can assign how many points will equal $1. When patients have generated epoints, you can use those points to pay invoices as a payment type.
Recommended Products – You can select one or more products in your inventory that will be added to the invoice automatically when this service is purchased.
eForms – You can assign one or more eForms to this service for your patient or for your staff to help the patient complete.
eTreatment Forms – These are forms related to their treatment and can be found using the icon link in the chart entry.
When you are finished, click add service or update to save your changes.
Add A New User
How To Add eForms To A Service
- Step 1, 2: Go To: Management>Catalogue>Services
- Step 3: Click the edit button for the service you wish to add eforms to.
- Step 4: At the bottom of the edit service panel, click on the eforms button to see a list of eforms for your clinic and/or click the eTreatment forms button to see the list of treatment forms available to use.
Clinic Supplies
Adding and Managing Clinic Supplies

- Go To Settings>Catalogue>Clinic Supplies
- Click “Add Clinic Supply” button and a modal will open where you can select the clinic supply you want to add. Note: You can add the same clinic supply more than once! You could do this if you want to have different versions of the same clinic supply to use. Example: You have multiple different prices/dilutions for Botox that you inject.
- Select the clinic supply you want to add and a window on the right side will open with the following fields to complete.
- Display name: this is the name you want to see on the injection template and on patient invoices.
- Price per unit – this is the default sale price to the patient per unit
- Cost per unit – this is your cost of purchasing. ie., if you buy 100U of toxin for $100 then you would enter $1 here as the cost is $1/Unit.
- Units on hand – this is your current inventory number of Units
- Sort order – you can arrange the order of each clinic supply. ie., if you have 4 toxins in use, you can set how you want them arranged for ease of use.
- Click the “Update” button to save your new clinic supply.
Disable LastPass AutoFill for emily
Disable LastPass Autofill
Symptoms
Causes
Resolution
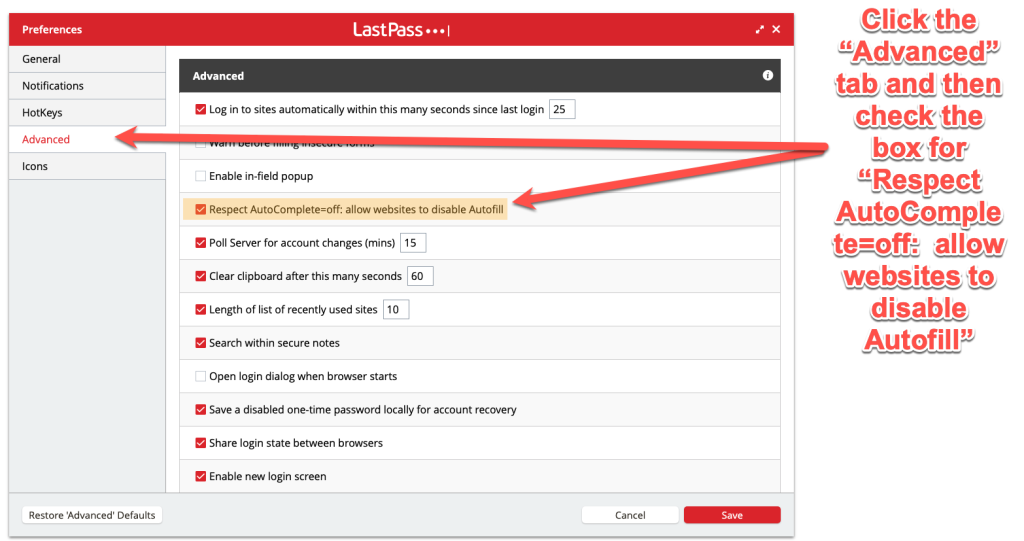
- Click on the LastPass browser extension and select Account Options.
- Navigate to Extension Preferences > Advanced.
- Select the Respect AutoComplete=off: allow websites to disable Autofill checkbox.
- Click Save.
Provider Schedules
Add Breaks
Managing Providers
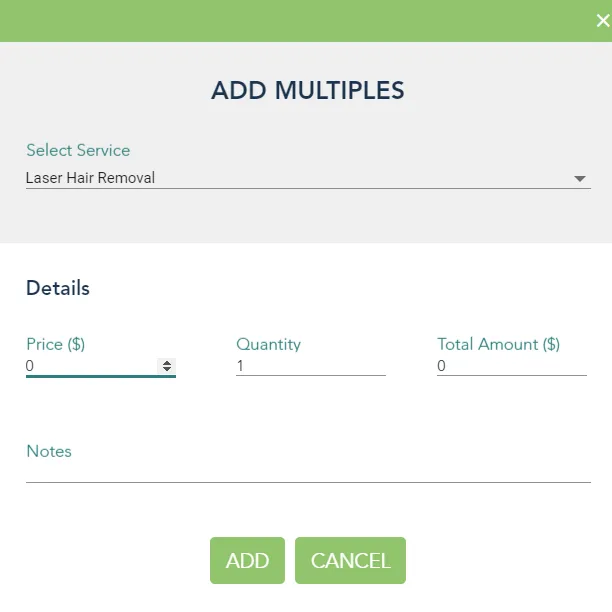
Package Treatments
Step 1:
Step 2:
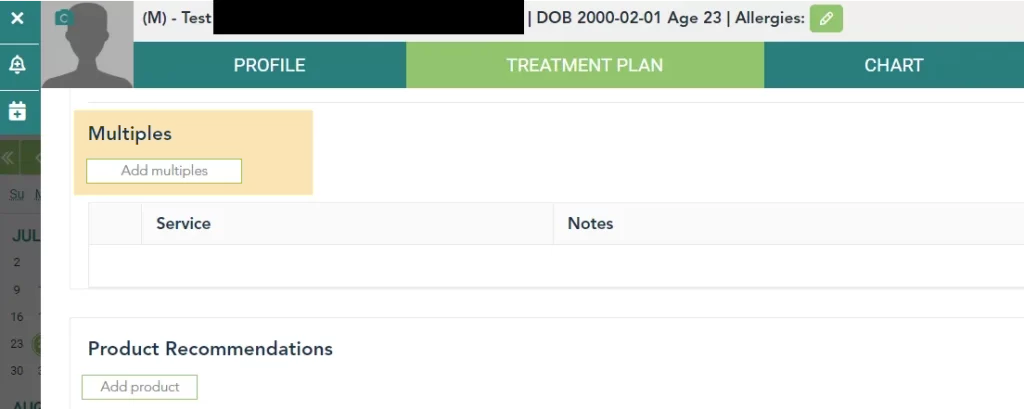
Step 3:
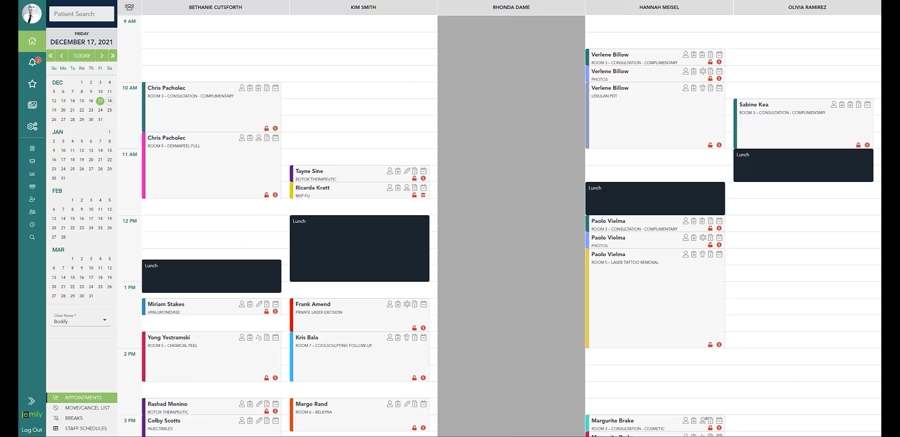
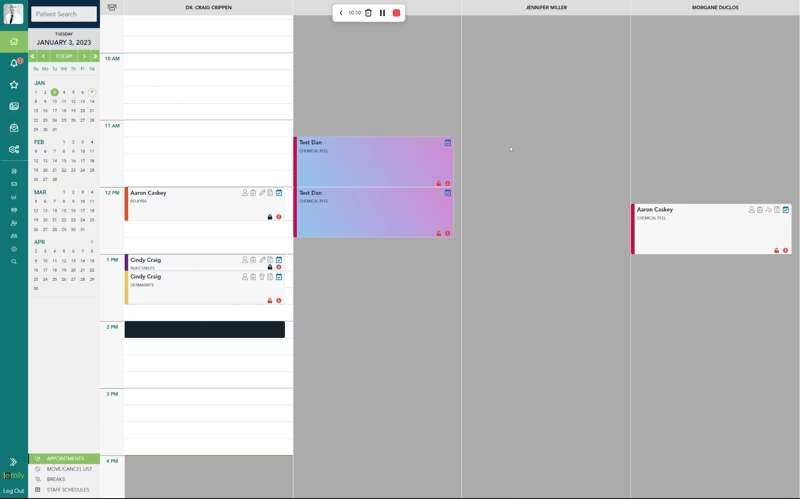
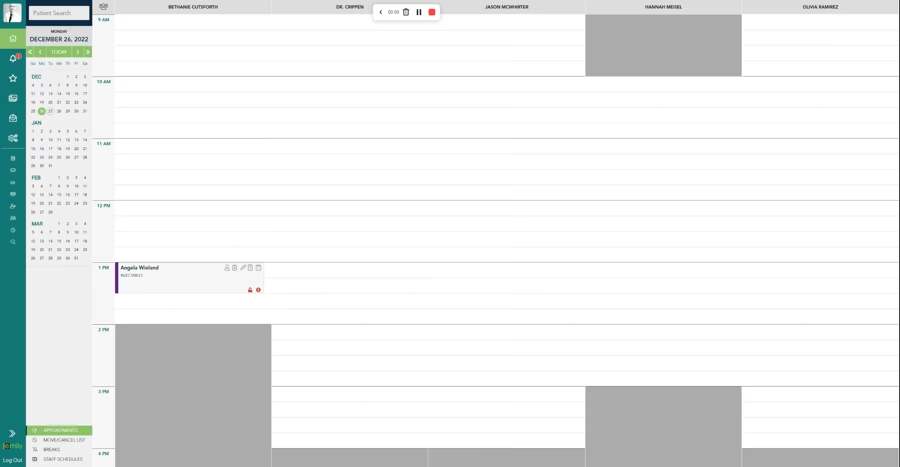
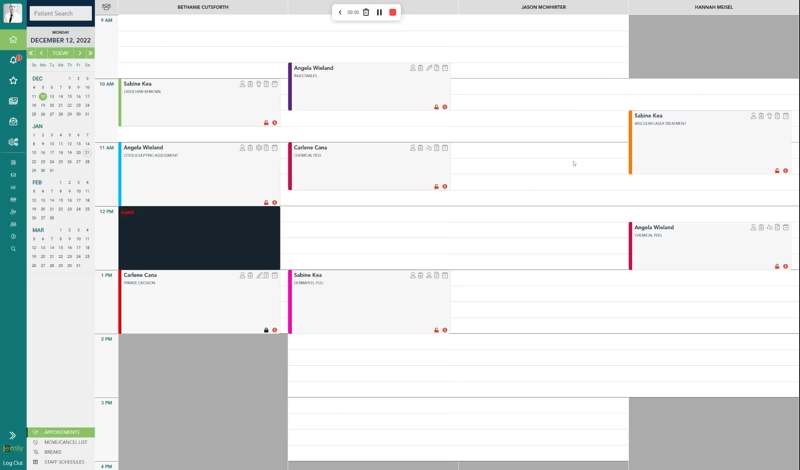
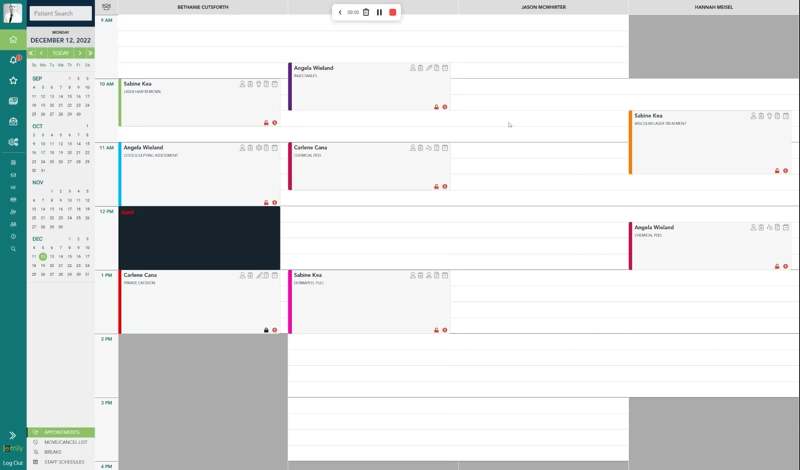
Scheduling Appointments
Setup Google Reviews
Manual:
Automated
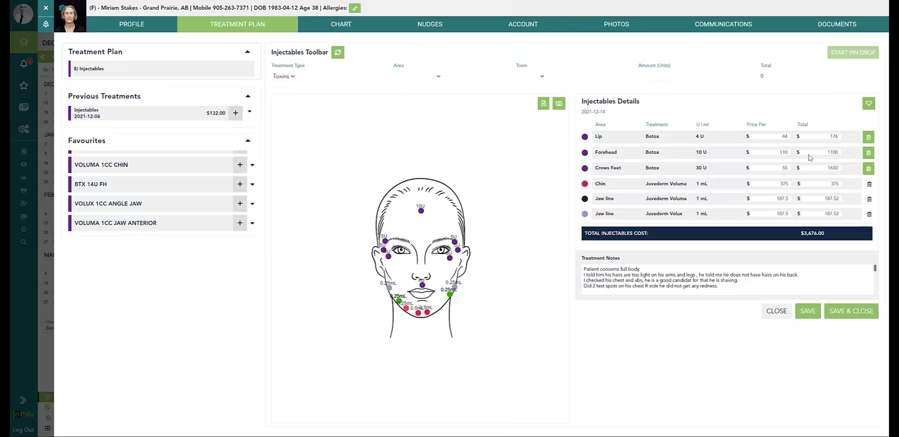
Toxin Injections
Performing A Botox or Toxin Injection
Step 1:
Setup Your Clinic.
Step 2:
Favourites
Previous Treatments
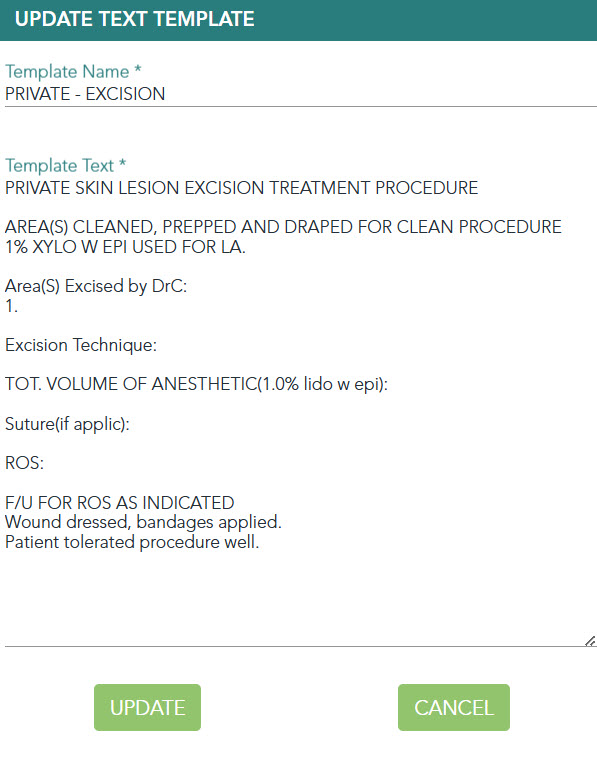
Create Text Templates For Charting

How To Create Text Templates
-
Step 1
Go To: Management>Catalogue>Text Templates -
Step 2:
Click on the “Add Template” button to open the edit text template panel on the right side of the page. -
Step 3:
Add a name for your text template, this will be the name in the drop down menu to use your text template in the charting tab.
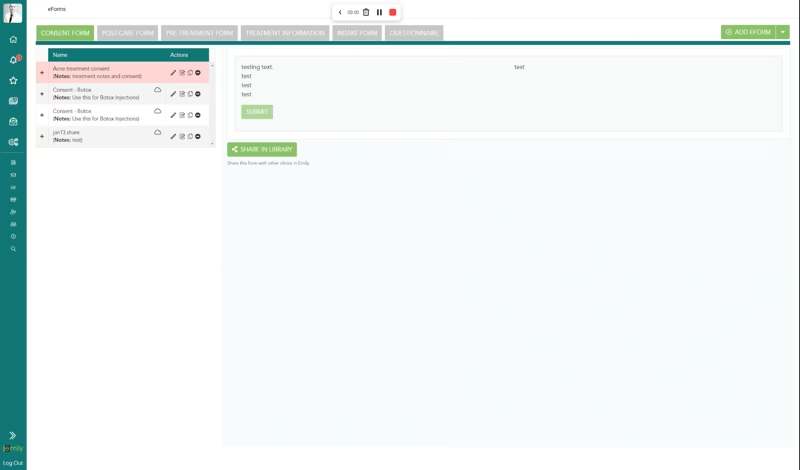
Sharing eForms
Add Columns
Required Fields
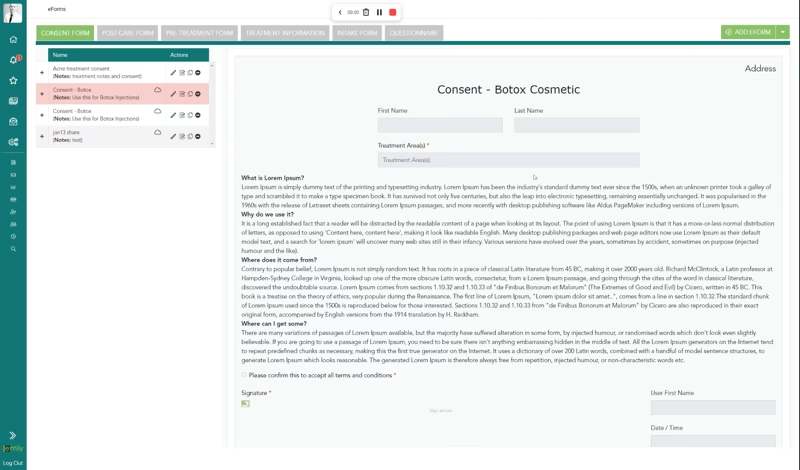
Sharing eForms
- Consent forms
- Post-care forms
- Pre-treatment forms
- Information/Handouts
- Intake Forms
- Questionnaires
Setup Google Reviews
Coming Soon
Add Columns
Sharing eForms
-
Step 1
Go To Catalog>Memberships tab in Settings. -
Step 2
Click +Add New Membership - Step 3 – Add Membership Add a name for the membership, description, $ amount and applicable taxes. Add a photo as well if desired, as this will help for online purchases of memberships. Also make sure to toggle the membership to “active” if you wish to have it available for purchase.
-
Step 4 – Usage
a. You can set memberships to expire automatically after X billing cycles or never in which case you can manually cancel the membership. Please note that the membership settings will still apply to any purchases up until the date the membership expires, rather than when it was cancelled. ie., membership is purchaed on June 6 and cancelled on July 10, the membership would still be active for the patient until August 5 as it remains active until the next billing cycle.
b. Memberships can be automatically cancelled after X billing cycles or manually.
c. You can also limit the number of redemptions for a membership per cycle if desired. - Step 5 – Credits a. Part or all of the membership fee can be added to the patients account/balance each billing cycle for use in paying future invoices.
- Step 6 – Services & Products a. Add any number of applicable services and products you wish to discount for patients that purchase this membership.
- Step 7 Click ADD to make this membership active and available for purchase.
Create Before & After
Sharing eForms
How To Take Photo on iPad
Analytics/Reporting
Coming Soon
Here you will find information about how to setup emily and use this software to its fullest potential. There is a lot to cover so take your time and use the search feature if you can’t find what you are looking for easily.
ePay
Coming Soon
Here you will find information about how to setup emily and use this software to its fullest potential. There is a lot to cover so take your time and use the search feature if you can’t find what you are looking for easily.